Miss Gioia

Saturday, July 12, 2008

Bibs (again)


How is it that we have 5,421 bibs in this house, yet I cannot ever find a clean one at lunchtime? Seriously.


I cannot be bothered to figure out this great mystery. Certainly no one would expect me to simply manage the clean bib stock. Tra la LA.


So instead, I just made more bibs. You know, to have on hand. Because if we have 5,428 bibs in the house, surely I will be able to find a clean one when I need it. Right?

Labels:

Monday, June 16, 2008

Received!


My doll quilt from the Lemonade Stand Swap arrived while we were in Beijing last week. I came back home to a mailbox stuffed full of goodies. This sweet little quilt has a snuggly, vintage feel. Such fun fabrics.


It was wonderful, just wonderful, to receive this little gem at the end of such a fun swap process. In addition, my lovely swap partner sent some other goodies, including this great doll she found on Etsy. Gioia approves.


Thanks so much S. I love it. You did a great job!

Labels: ,

Friday, May 30, 2008

Lemonade Doll Quilt Swap

Gioia's birthday got me thinking back to my own childhood birthdays. I don't remember many of them, but two stand out. The first memory isn't really a memory at all, but a mental image of a picture that was taken on my first birthday. We were living in Pasadena, California at the time, and my parents took me to a park to celebrate. The one picture that survives that day is of me on a picnic blanket with some cake and my mom. At least, that is what I remember of the picture. I always thought that was such a great thing to do for a one year old's birthday. Low key, very personalized, and focused on family. Hippie cool.

The second birthday memory that stands out is one when I was in elementary school in Dhaka. I had a Hollie Hobbie themed birthday, and I remember that we had Hollie Hobbie sugar cookies that each guest got to decorate. Knowing what I know now about how hard it is to find certain baking stuff while living overseas, I have NO IDEA how my mom found Hollie Hobbie cookie cutters and made sugar cookies in Bangladesh in the early eighties. No idea. Little miracles aside, that stands out as a good, fun birthday memory for me.


So as I was contemplating the doll quilt design for the swap, I thought it would be fun to do something that incorporated an actual doll. And then I remembered the Hollie Hobbie birthday party, and that led me to Sunbonnet Sue, the original Hollie Hobbie. Sunbonnet Sue images were pretty popular quilt block designs around the turn of the last century.

The fabrics that I had selected from the stash also lent themselves to a folksy-type design. At the end of the day, I decided to make the applique design as a picture portrait of a little doll on a day out. A doll within a doll quilt, if you will.


The Sue pattern came from this site of dedicated Sunbonnet Sue applique patterns. I used Mimi's dryer sheet trick for the applique, and I used free motion quilting to trace around the two main design groups: the girl and the balloons. You cannot see it in the picture, but I also quilted some rolling hills and a sun in the upper left corner. The edges of the picture are framed in buttonhole stitch (aka mattress stitch), and the balloon strings are embroidered chain stitch.

The binding and some of the applique pieces are made from a very precious piece of Liberty fabric that one of my good friends brought back from London for me years ago (hey Liz). I love this fabric so much that I have been afraid to cut into it, but I made myself do it for this project. Now that it is "broken into," maybe I will feel more comfortable using bigger pieces now, maybe even make Gioia a dress or two.


I hope my swap buddy likes her quilt. It sure was fun to make.

Labels:

Thursday, May 29, 2008

Froggies


For MissG's birthday party, we needed a game to entertain the littlest guests and some favors for them to take home. We gathered some scrap fabric from the stash and lentils from the cupboard and made bean bag frogs. Chris found the pattern on the web - something similar to this one. The game was simple - toss the froggies into the hole in the lily pond. Harder than it looks, though.

It was a fun idea. Even the adults got into the game. Some of the froggies had to have surgery before the end of the party because they were thrown with extreme vigor and enthusiasm.


At the end of the party, each little guest took home their own bean bag frog. Game and favors in one, all by using materials we had on hand. Very good.

Labels: ,

Sunday, May 25, 2008

Birthday Welcome


Welcome to my party!


I turn one this week, and everyone is invited to celebrate with me. Come on in. Have a cupcake (or two).


Door hanging made from nursery fabric scraps (yes, I still have some), fabric stamps, and sitchettes made long ago from a WeeWonderfuls pattern.

Labels: ,

Thursday, May 8, 2008

Completing the Gift: Mattress


Gioia's birthday gift is nearly done. I made a mattress and little bitty pillow. The mattress is anchored in four points to simulate the indentations of a real one. It would have been cuter to use covered buttons in each of the four points. Perhaps I can add those later when choking is no longer a risk.


The pillow is cute too, but a little too small. Maybe I can make another, bigger one. Maybe not.


So much to do still this month. I have to:

-Make invitations for G's party (this weekend)
-Start on the doll quilt for the swap (this weekend)
-Find a cupcake pan (this weekend)
-Make dolly outfit, perhaps knit a little sweater (on my flight to/from Shanghai next week)
-Finish the swap quilt (next weekend)
-Make trial cupcakes for party (next weekend)
-Prepare for the party: shop, cook, decorate (whenever possible)

If I have extra time, maybe I can also make some party decorations, perhaps some bunting....Hmmmm. Better get started.

Labels: ,

Monday, April 28, 2008

Quilt One


The first doll quilt is finished. I am actually pretty happy with the final product. I used my new walking foot to machine quilt around each little rectangle in the Chinese coins pattern. For the binding, I loosely followed Heather Bailey's tutorial. I say loosely because I was all like - oh yeah, I totally get the mitered corner dealios. When I did not get it. At all. So, on the next quilt - the REAL swap quilt - I will pay more attention.

But despite the crazy corners, the binding looks nice overall. I sewed it up quickly the first time and it looked like crap. Then I spent 20 minutes on the internet saying dear Google, show me a better way! Two times is a charm, apparently.


So the birthday quilt is done and draped over the assembled IKEA dolly bed that Chris brought back from Atlanta. Yes, I am desperate enough to import doll accessories for my daughter's birthday. We even have an IKEA in Taipei, but they don't sell doll beds. How stupid is that?

I want to make a little mattress and pillow this week to complete the bedding. Then on to other projects.

Labels: ,

Sunday, April 20, 2008

Wonky


Now why is it that I haven't quilted in 14 years? Oh yes! Because I suck at it.

Quilting requires a tremendous amount of patience. Those tiny little seams have to be exactly right, or they do not line up. And the result is poor patchwork. The truth is that I am not really a patient sewer. No.

As I mentioned before, I am working on two doll quilts: one for a swap and one for Miss G's birthday. This is the top of the birthday doll quilt. It uses scraps of fabric* from her nursery stash.

I figured I would try a Chinese Coins pattern, which happens to be the April/May feature on Flickr's Doll Quilt Challenge group. Two birds - one stone. Hey! Problems abound, however. I tried to make my strips random, but wound up having some fabric strips look like they continue across the width. A little off of straight, though, not quite right. So instead of a nice and random look, it appears like I planned for the blocks to be straight, but missed. If I blur my eyes and look at it from a distance it looks OK. Probably Miss G will not notice. Not this year anyway. Heh.

Have no fear Doll Quilt Swap peeps. The design for that one is more of an applique design, so you are safe from my wonky patching. Just think of this one as a warm up for the real thing.


*Good gracious - when will this fabric run out!? I loved it in the beginning, but after one more project I will probably be done with Heather Ross forever.

Labels:

Wednesday, April 16, 2008

Pile o' scraps

I have been in a creative rut lately. I am missing my normal urge to get off the couch and make something. I contemplate, yes. But the actual "doing" is a problem.

I have, however, birthday gifts for my baby to plan. After seeing all of these fabulous doll quilts, I decided to try my luck with a pile o' scraps.


To make sure I follow through with actually making something, I signed up for a doll quilt swap. By the end of May, I need to make two bitty quilts: one to mail out to my swap partner and one to give to a little girl who is getting bigger everyday.

Speaking of whom, I know that some of you care not one whit for my crafting plans. You only come here for kiddo pics. OK, fine. You twisted my arm.

Labels: ,

Friday, April 11, 2008

Gifties


Some friends of ours are expecting their first child this summer. Chris is headed back to Atlanta next week (to pick up Frankie - YAY!), so I needed to get on the ball with a baby gift for him to take back. I thought to myself - knowing what I know now, what handmade thing has proven most useful?

Of course, the answer is: bibs and dry wipes. Things we use all the time. Things I wish we had more of so we could do less laundry. Things that keep our messy baby respectable - just barely.

First up, two bibs from the Chickpea pattern, which is available here. I was able to use up the last of my Funky Monkey flannel fabric on these projects. The Hollywood Squares monkeys just KILL me.

Way back BG, I made some cloth wipes for our own use. The idea was to be green and use them as wet wipes. But that was just stupid. Commercial wet wipes are some of the best things ever invented. It turned out, though, that the dry cloth wipes are really handy to have around. Some are in my purse, some are in the diaper bag for meals out, lots are in the high chair basket for messes and spills, and even more are tucked away in the changing table.

So in addition to the bibs, I also made a set of dry wipes for our friends' little kiddo on-the-way. Instead of using the serger for the edges, I did a more traditional turn and top-stitch approach. Here they are next to anther Muji doll, who completes the gift. I like the elephant even better than the bunny Gioia got for Easter, but sadly he has to go on to his new home.

Labels:

Wednesday, April 9, 2008

Vintage Sundress (finished)


Remember this dress? I finally finished the bloomers (measure kiddo, snip elastic, push through casings, sew crotch). You cannot see the panties in this picture, but believe me, they are cuuuuuute.

I think I need to make some more of these outfits, perhaps in a lighter weight fabric. The Amy Butler fabric is fabulously orangey, but is also a bit stiff. Taipei was dang hot today. I cannot imagine what August will feel like to my already sweaty kiddo here.

Labels:

Sunday, March 23, 2008

Easter in Taipei


This was our first holiday as a family. It was such a lovely day. Gioia had a great time digging through her Easter basket. When you can't give someone candy, putting an Easter basket together is quite challenging. Two items were really for when she is bigger: a jade cross and a bunny charm. We had to watch her like a hawk when she opened those. We we sure she would put the jade bunny straight into her mouth and choke and die. The tiny bunny was a hit, actually. Chris had to wrestle it away from her in the end.


I really liked the recycled fabric bunny from Muji, but she really wasn't that into it. Perhaps she liked the one her Grandma sent better. And see the basket - which isn't really an "Easter basket"? Yeah, that's what happens when you remember at 11:30 the night before that you actually need something to hold all of the goodies. But, really, who needs a long handled basket cluttering up the apartment?


After the basket was opened and breakfast eaten, we headed off to mass with our friends. But we decided to take the subway instead of a cab, and...well...we got a bit lost. Did you know there are at least TWO 51 Zhongshan North Road places in Taipei? Yeah. We made it, though, just in time to light some candles and sing some songs. An usher gave Gioia a real hard boiled egg, which kept her busy and quiet for at least 20 minutes. After church we had fajitas and margaritas. It was excellent. Perhaps Mexican food can be a new Easter brunch tradition?

Sooooo let me tell you about Gioia's dress. I finished it last night at 11:44. Yes, nothing like last minute sewing. The truth is that I started it late. We just got back to Taiwan a month ago, and the materials I ordered took a couple of weeks to arrive from Australia. And wasn't Easter so crazy early this year!? As a result of all of that, I only started the dress a week and a half ago. I told myself that if I didn't finish for Easter, then it could be her birthday dress. But I finished, and it was really cute today.


I used Cherry Williams' Baby Bishops pattern as the base for the dress. The smocking plate and scalloped edge technique came from an article in an old Sew Beautiful magazine.* I made some silly mistakes,** but it came together quite nicely in the end. Here is a closeup of the embroidered chickies with french knot eyes. Precious.


More Easter pictures are here.

*I think this was the Spring 2007 issue. Hard to say, though, because I have been subscribing for so long that I have to sort through every magazine and save the articles I like in binders. The issue date is not printed on each page, so the articles and patterns can get mixed up in my files. The article was called "Chicken Scratch," and the designer was Linda Richards. Oh wait, good old google tells me it was issue #111 after all.

**Like forgetting that it is important to remove the smocking gathering threads AFTER finishing the neck binding, not before. Yargh.

Labels: , ,

Tuesday, January 22, 2008

Zakka Love

I found a cute little Japanese zakka store by my house this weekend. Sadly, it did not have too many tools to be used in making zakka. It was mostly stocked with handmade items imported from Japan's crafting community. After digging through the store, however, I found this cool rubber stamp alphabet set and a fabric ink pad.


I broke out the stamps right away, and quickly whipped up a door pillow out of nursery fabric scraps. You know, as a reminder...just in case we forget when Gioia is sleeping.

Labels: ,

Monday, January 14, 2008

Patchwork Cube Updates


Lately, I have been getting such lovely emails with pictures of patchwork cubes made from my tutorial. The picture above was sent by 54mama. I have been meaning to set up a flickr group for all of these creations, and today I finally managed to get it together. If you make a cube, feel free to post a picture here for all to admire.

More importantly, Anabeth sent me an email with the information that this cube is representative of a Menger Sponge. How wonderfully geeky! Here is Anabeth's cube.


Thanks for sharing everyone. You make my inbox so happy. Just like the frogs in Karri's cube.

Labels: ,

Sunday, January 13, 2008

Big Footed Bunny


On the way to mail the care package last week, Chris stopped off for his Mandarin lesson. They used the items in the box as tools for the lesson and discussion, and apparently his teacher was astounded that I had made the little kitty, not just purchased it from a store. They had quite a lively discussion in class about making things, and Chris was able to teach her a thing or two, like how hats are best knit on circular needles (crazy, she thought).

At the end of the day, she asked if we could make her a doll too. So Chris and I pulled out the book of patterns and the stash fabric this weekend, and we made Mr. Bunny here. Just like the kitty, he is made from a weewonderfuls pattern: the "Big Footed Bunny." His body is brown cotton velveteen and white flannel. The pants are made from one of Heather Ross' cotton prints and a few scraps of grosgrain ribbon. And his eyes - we like his eyes the best. We couldn't find a store selling buttons, so we opted for some jade beads that we found at the market down the street.

For the record, Chris did most of the work on this little guy. I did all of the machine work, but he did almost all else.


Snuggly little bunny. Hope you have fun with your new momma.

Labels:

Monday, December 3, 2007

Ornament Swap


One of my flickr groups organized an ornament swap for the holiday. I made six tree faeries for the swap based on this great tutorial . For this little project, I was able to use supplies from my doll-making stash, including some lovely hand-dyed wool felt from Australia. All six were mailed out to the recipients today.

Unfortunately, I did not make an extra ornament for myself. Maybe one of these days I will make another. Hah. Probably not. But in exchange for these girls, I will get six different ornaments back from my lovely swap group. So excited.

Before they left, we got to enjoy all six hanging on our own tree for a bit. A win-win for all.

Labels: ,

Thursday, November 29, 2007

Cover that up!


No, this isn't a dirty post. Well, not in the way you think. When we packed up our stuff in Beijing, I finally noticed how very ratty our ironing board looked. It was so dirty and torn that the ayi had been ironing on top of a towel for months. Oops. So, now that we are in Taipei and without an ayi (doing our own ironing - yikes!), I had to do something about that cover.

The fabric is a piece that I bought in a remnant pile at a great fabric store in Chicago. It was ridiculously cheap, and I loved it so. Still do, in fact, and I have loads left.

I still haven't quite gotten the hang of making these covers yet, but this one is functional and not at all ratty - all good things.

Labels:

Sunday, September 16, 2007

G is for Gioia

I woke up this morning feeling like I just "had" to make a pillow for Miss G's nursery. We are moving soon, you see, so I have to rearrange the nursery plan in my mind. The new one has a big white chair in it (in my brain), and that chair needs a pillow.


Since I have been on this applique kick lately, I decided to try making a pillow with a big ol' G in the center. I am quite tickled that it worked.


The binding did not go on quite as nicely as I had hoped, and the center G needed some interfacing to keep the pink flowers from showing through. Enh. Lessons for next time. Still happy with it, regardless.

Everybody is pleased.

Labels: ,

Monday, September 10, 2007

Gifties - Bibs and Matching Onesies


It seems that everyone I know is having a baby these days. And all are boys! Our friends Liz and Adrian's second son arrived on Friday (early). Welcome Cael. We cannot wait to meet you.


After many weeks away from my sewing machine, I was able to dive back in this Sunday and make some baby gifties. My friend Amy made some super cute T-shirts with patches this summer. I followed her lead with some pre-purchased onesies found at Zara in Hong Kong. On sale (hee hee).

To add the patch, all you have to do is cut out the fabric square and then use double-sided, iron-on adhesive to anchor the patch on the onesie. Then use a zig zag stitch to outline the edges and ensure it stays down. You can use a matching thread or a decorative color. Simple and cute. This takes ten minutes, tops.


I also wanted to make the bib in Amy Karol's Bend the Rules Sewing book. But when I opened the book Sunday afternoon, I discovered that the pattern had to be enlarged on a copy machine. Who has a copy machine at home for impulse sewing? Instead I typed in "bib patterns" into good ol' google, and found a simple pattern. I added seam allowances to the pattern I chose so that I could sew, turn and topstitch instead of using binding.


I made four sets, each with a bib and a matching onesie. They turned out pretty cute, especially for an afternoon of TV watching and leisurely sewing. Two sets were made with flannel fabric from the 5 Funky Monkeys collection. I love the faces on the front pannel. It makes me imagine a Hollywood Squares for Monkeys. You cannot see it, but the back of the bib uses a red flannel splayed with yellow bananas. Precious.

The other two sets used some Heather Ross fabric (goldfish in bags) for the front and plain white flannel for the back. I love the Heather Ross fabric. It is incredibly soft and the fish are hilarous. Each one has a name, like Goldie or Swimmy.

Not bad for a Sunday afternoon.

Labels:

Thursday, August 9, 2007

Sundresses


A few weeks ago, I discovered that there are tons of vintage children's sewing patterns on eBay. Yes, I know. Where have I been? Well, once I figured it out, I went a little crazy and bought a bunch.

I bought some single patterns and one large lot of several unknown patterns. When I sorted through the lot, I realized that I had one pattern which was nearly identical to another one purchased singly. They were different sizes, thank goodness, but the basic pattern was pretty much unchanged in the two versions.

I made one outfit from each pattern on Sunday. Both came with a pattern for bloomers that have elastic at the legs and waistband. The pattern(s) says to measure the child's waist and leg circumference and then add 2 inches to get the appropriate length of elastic. Since I have no child to measure yet, the final bloomer steps will have to be done later. This is a difficult thing. You want to do lots and lots of stuff to prepare for the coming of the kiddo, but certain things just cannot be done ahead of time.

The picture at the top of this post is of a size 1 outfit made from the Simplicity 5052 pattern, which was published in 1972. The bloomers will be much poofier and gathered once the elastic is inserted. For now, however, we must all just use our imagination to see the cute bubble bottom that will be. Look at the fabulous cross-over straps in the back.


This size 2 outfit was made from Simplicity 8537, which was published in 1978. Basically the same pattern, but with an optional scalloped hem.


I guess those peeps at Simplicity knew how to "leverage" well.

Labels:

Wednesday, July 11, 2007

Sweetest Little Dress


This weekend I put together the "Sweetest Little Dress" pattern by Jackie Clark. I am not sure where I bought the pattern, but I was attracted by the simplicity of the design. The pattern came with embroidery instructions for the bodice and the skirt. I really wanted to use my Liberty stash fabric, though, which was busy enough without embroidery.

Sadly, the dress was uninspiring, and I do not recommend the pattern. Easy to make, yes, but I think the fabric is the only thing that rescues it from looking like a sack. Also, it has a very weird shoulder button closure that I didn't quite like. I prefer a traditional back closure. To be fair, I was able to pull out my new covered button press, which was fun.

Sizing was odd too, as it "fits up to 24 lbs." I can handle European sizes and US baby pattern sizes now, but this one is confusing. Once finished, the dress seems to be either a 12-18 or 18-24 month size. Its sack-like nature could make the sizing deceiving, however.

All in all, this dress was a bit disappointing.

Labels:

Saturday, June 23, 2007

Patchwork Cube!

The fabulous J sent me an email with a picture of the patchwork cube she made with my tutorial. It is precious, so I asked her if I could share it here.


Don't you love the colors? And that is a very cute baby lurking in the corner.

J - Thanks for sharing. You made my day!

Labels:

Friday, June 8, 2007

Rag Doll Tutorial

Materials

Body fabric* - 0.5 yard
Embroidery floss for face – black and red
Needle and thread
Yarn for hair
Stuffing
Pattern

* For the example doll shown here, I used plain muslin which was dyed overnight in coffee.

Directions

1) Cut out all doll pattern pieces from body fabric.

2) Sew two arms and two legs together with right sides facing using 0.25 inch seam allowances.


Clip curves, trim, turn and press.


Stuff arms and legs lightly


and place aside.


3) Sew doll torso piece to head two times, right sides together. Press seam down toward torso.


4) Baste arms and legs to the right side of one of the new body pieces. These pieces should be sewn facing inward. When the doll is turned and stuffed, the arms and legs will stick out from the body.


5) Once the arms and legs are basted into position, place the second body piece on the first, right sides facing. The arms will be enclosed within the two body pieces, but the legs should hang out of the bottom. Sew around the body from the lower left corner (next to the left leg) to the lower right corner (next to the right leg).


6) Clip curves, trim and turn. Stuff body.


7) Sew doll bottom closed either by hand or by machine.


8) Use embroidery thread to make eyes and mouth.

9) Add yarn for hair.

Remember, rag dolls are not supposed to be perfect. They are better if they are a little wonky. Made with love.

That's all for this tutorial. I think I'll do a separate post on hair one of these days.

If you make a baby, please show me! I would be so excited to see her or him.

Labels: , ,

Wednesday, June 6, 2007

Doll Dress Tutorial

Let's start with a little tutorial for the dress that is included in the Rag Doll Pattern.

Materials

Dress fabric* - 0.25 yard
Needle and thread
Snaps or buttons

*Note that quilting cottons, linen or other light fabrics will be easiest. Heavier fabrics, like denim or corduroy will likely be difficult (or impossible) to turn at the shoulders.

Instructions


1) Cut out bodice pattern pieces from dress fabric.


2) Cut out an additional piece of fabric measuring 8 by 30 inches.

3) Sew bodice front to back at shoulders.


Press seams flat. You will have two bodice pieces. One piece will be the outer top and the other will be the lining.


4) Placing right sides of the two bodice pieces together, sew around neckline and down the two bodice back edges. I am using a contrasting color thread for illustration.


5) Sew left and right armholes.


6) Clip curves and corners, turn and press. When you turn, you are primarily pulling the bodice structure inside out, which involves pulling a lot of fabric through the narrow shoulder opening. You may want to use some tweezers to gently nudge it through. Again, using a lighter, thinner fabric helps this process.


7) Sew sides together. This is the last step to complete the bodice top. If you have never done this before, then take a moment to look at the remaining edges before you start sewing. You will basically start with the two ends of an armhole (sewn in step
5). Open up both sides, with the seam in the middle, and then bring them together - right sides facing - and sew straight across. Turn and press.


8) Prepare skirt. Fold and press 0.5 inches on one long side of the rectangular piece of fabric. Fold and press the same amount again. Topstitch over fold.


9) Sew the two short sides of the rectangle together, right sides facing, from the hemmed edge (step 8) to approximately 2.5 inches from the top edge (the un-hemmed long side). Press seam open and continue pressing up through the 2.5 inches of the unsewn area. If you like, you can cut a bias strip and sew it to the skirt opening. If you have never done this before or are feeling lazy, you can instead top stitch down over both sides of the skirt opening folds.


10) Run long gathering stitches along the unfinished (top) side of the rectangle. Typically, two gathering lines are run in case the first one breaks while adjusting. Run one 0.5 inches from the side and the second 1 inch from the side. If you have lots of experience, you can get away with one line. Pull gathering threads.

11) Align the bottom of the outer bodice to the gathered skirt, right sides facing. Pin, baste and then sew. This pattern is drafted with a large allowance on the bodice for attaching the skirt. Your final seam should be stitched 1.5 inches from the edge. If you prefer a narrower edge, just trim 1 inch from the bottom of the bodice and the top of the skirt and then use a 0.5 inch seam allowance. Once your skirt is attached, go back and trim the excess fabric.


12) Attach lining to skirt seam by hand. Topstitch if desired.


13) Finish the back of the dress with buttons, snaps or Velcro.

Labels: , ,

Tuesday, June 5, 2007

Rag Doll Pattern


This spring, I taught a doll making workshop here in Beijing. At the time, I couldn't find a free pattern to use that was really built for beginners. So, I developed my own. If you are looking for a basic rag doll pattern, feel free to download and use mine. Over the next week, I will put up two tutorials based on this pattern: one for the doll body and one for the dress. All of the instructions are in the pattern, though, so get started right away if you like.

This is Tiddlywinks. My husband made her in the workshop from the pattern. I think she is fabulous, especially with her luscious green hair.


The basic rag doll pattern also comes with a drop-waisted sundress pattern, as modeled by Miss Tiddly below.


When she is not modeling, however, Miss Tiddly likes to change into her overalls and relax.


Sometimes I wonder about Miss Tiddly, though. She keeps trying to snuggle up to my husband. Not sure if I trust her completely.

Labels: , ,

Sunday, March 18, 2007

Patchwork Cube Tutorial

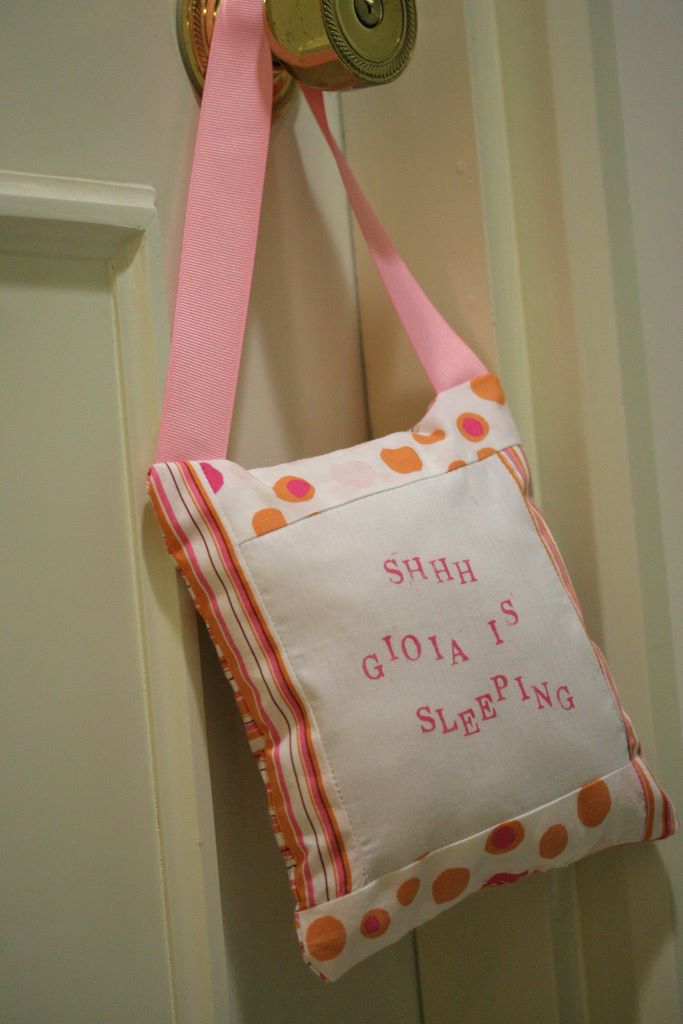
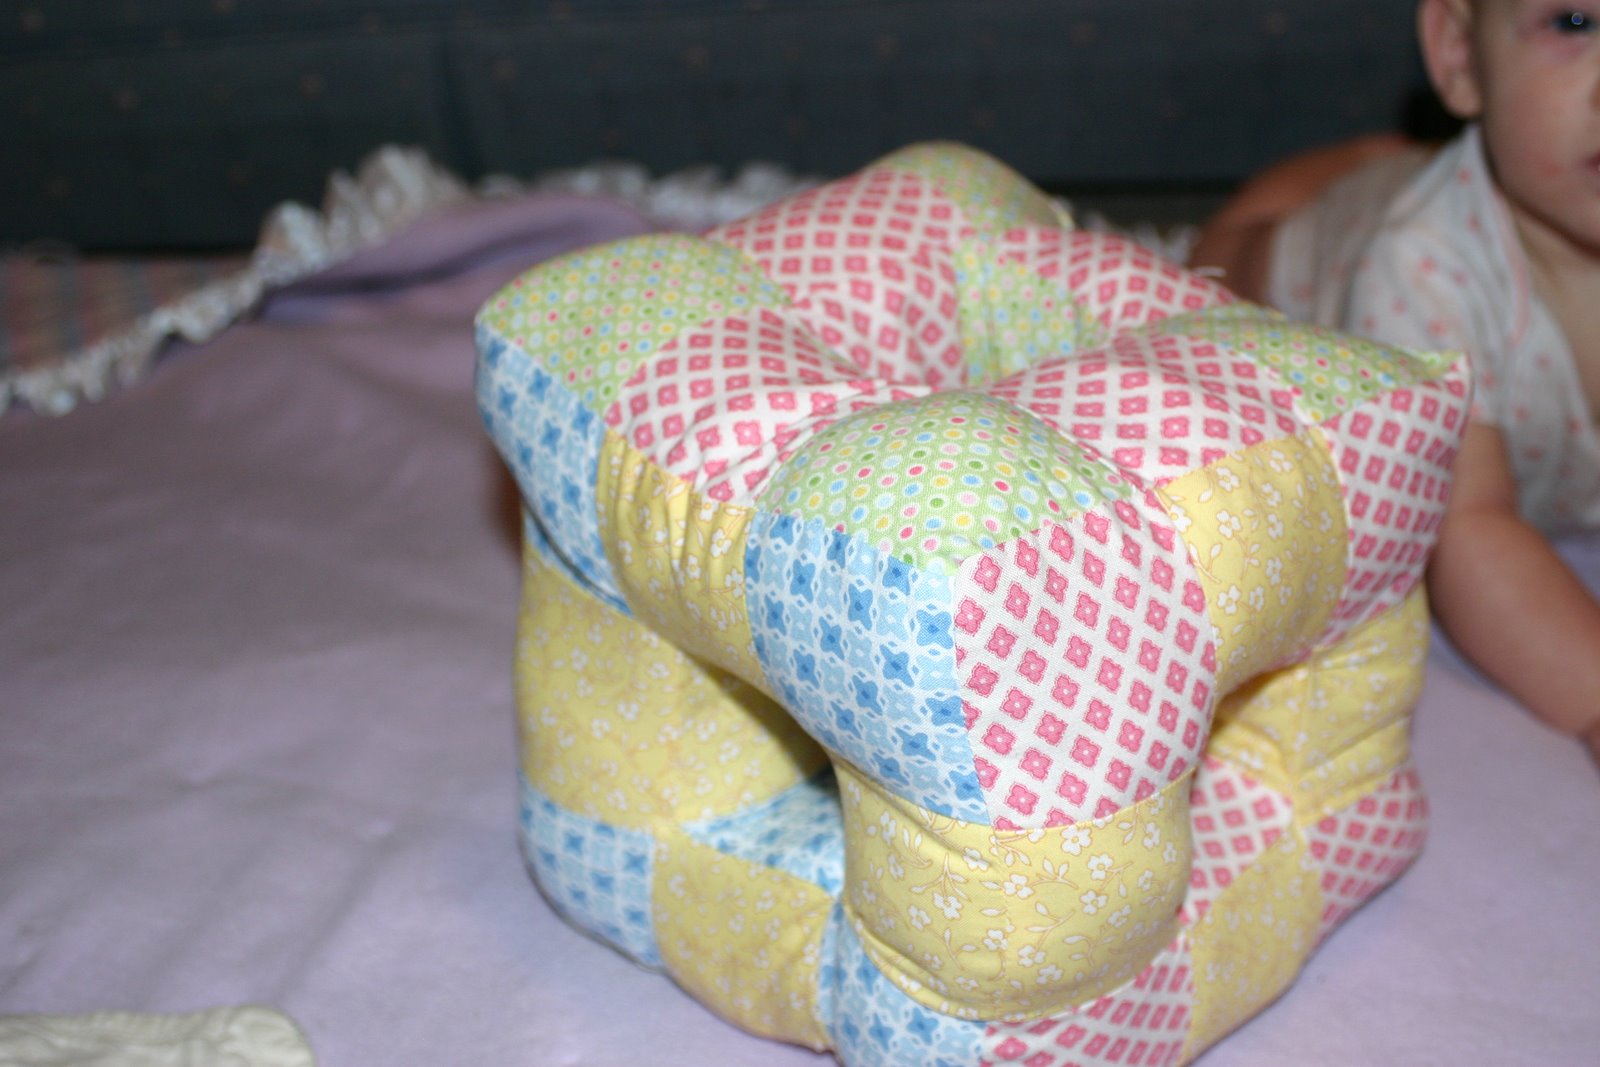
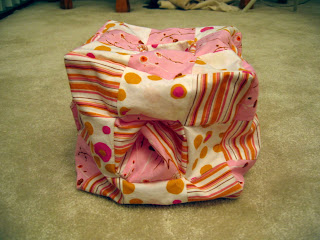
I was wandering in a shop in XinTianDi one day and saw the cutest stuffed patchwork cube. Wow, I thought, what an ingenious idea. I thought Wow! again when I looked at the RMB400 price tag (about US$50). For some perspective, our ayi in Shanghai made RMB1,000 a month, so there was no way I was going to buy this little cube for such an outrageous sum. I traipsed off home to recreate the design, and it actually worked.


Here is a tutorial for the patchwork cube, in case any of you guys would like to try one as well. This project gets a little tricky at the end, but it will come together with a little faith and patience. Basic sewing skills are a must. If you are struggling with the sewing machine in general, then this project may be frustrating. Have heart, though!

Materials needed
Sewing machine
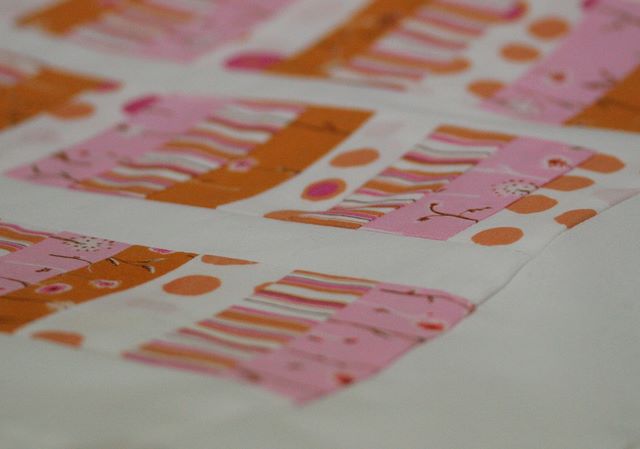
A little less than 1/4 yard each of three types of fabrics (hereafter referred to as fabric A,B,C) NOTE: This yardage estimate is for three inch squares.
Coordinating thread
Hand sewing needle
Iron and ironing board
Sharp scissors
Stuffing (e.g., washable poly-fill)
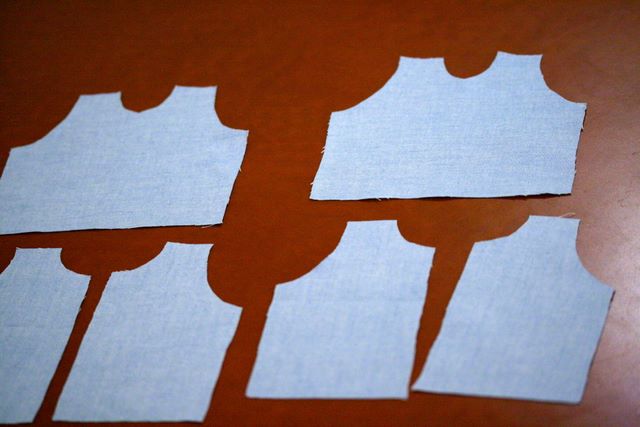
Step 1: Preparation

Begin by cutting out 24 squares each of fabric A,B and C for a total of 72 squares. You can make your squares any size you like; the bigger the squares, the larger the cube. I used three inch squares and a 1/4 inch seam allowance for the cube displayed above. You can go smaller, but keep in mind you will be doing a lot of turning and seaming from within at the end, so really small squares may be hard. Start big and move to smaller squares as you get comfortable with the technique.

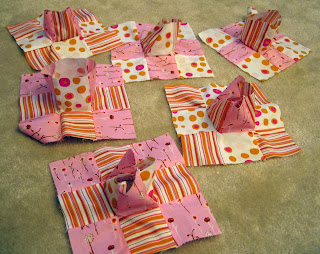
Divide your squares into two groups: one group with 16 squares of A,B,C (total of 48 squares) and a second group with 8 squares of A,B,C (total 24 of squares). Set the second group aside. Further subdivide the first group into six sets of eight squares, with two types of fabric in each set. You will use these blocks to create the foundation blocks, the six outer sides of the cube, so fabric layout becomes important. Here is a sample guide, which I used for my cube. This picture assumes you will make two of each type block for a total of six blocks.


Of course, you can do whatever you like. I did not want any two squares of the same fabric touching on the outside of the cube, and this is the simplest layout that will achieve that goal.
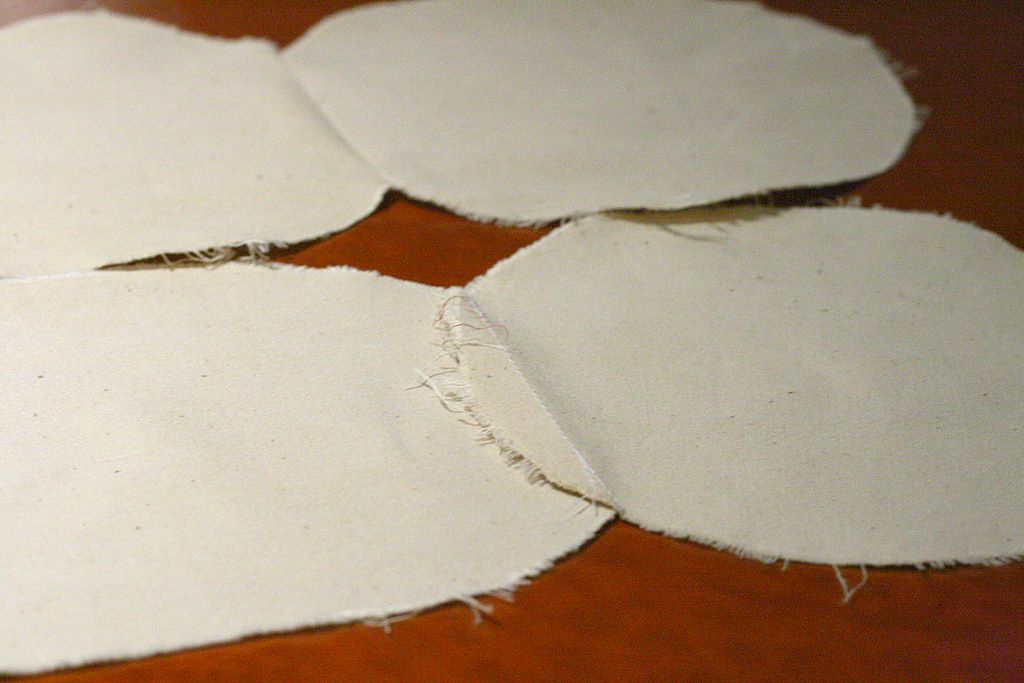
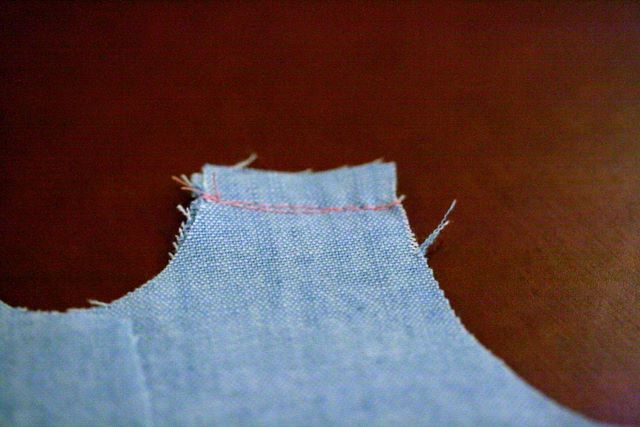
Step 2: Foundation Blocks

Start piecing each of the sets (six of them) together. These are your foundation blocks. Foundation blocks have an empty center and three blocks on each side.


Sew your squares together into foundation blocks, right sides facing. I used 1/4 inch seam allowances, but do whatever makes you comfortable. All things equal, the larger the seam allowance, the smaller the end square.

TIP: Backtack at the beginning and end of each seam segment. This will become crucial as your seams begin to interlock. I also find it helpful to cut of the hanging threads as I go, else they get in the way really fast.

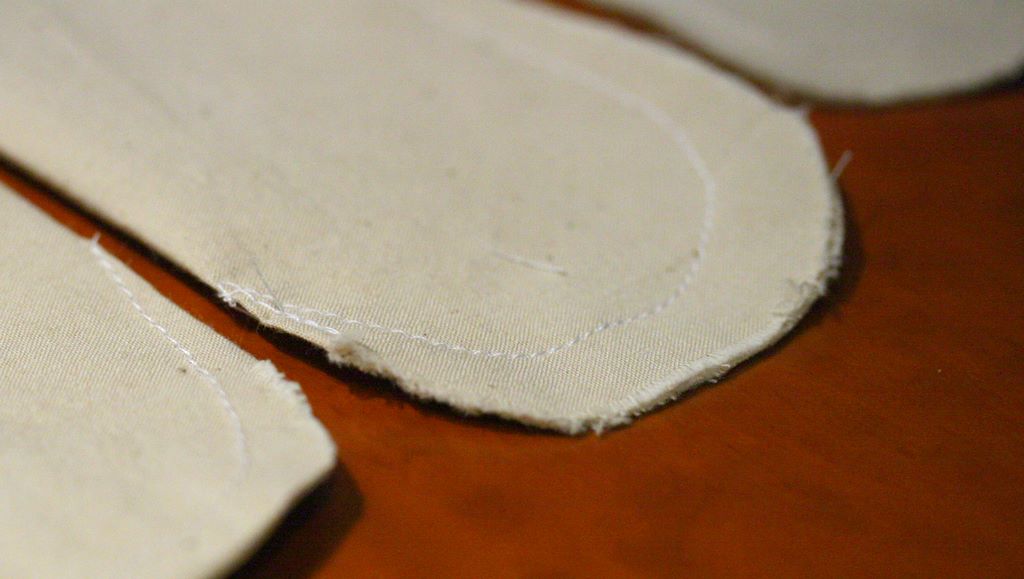
Here is a picture of the underside of a finished foundation block. Seams are pressed open (or to one side as you prefer).


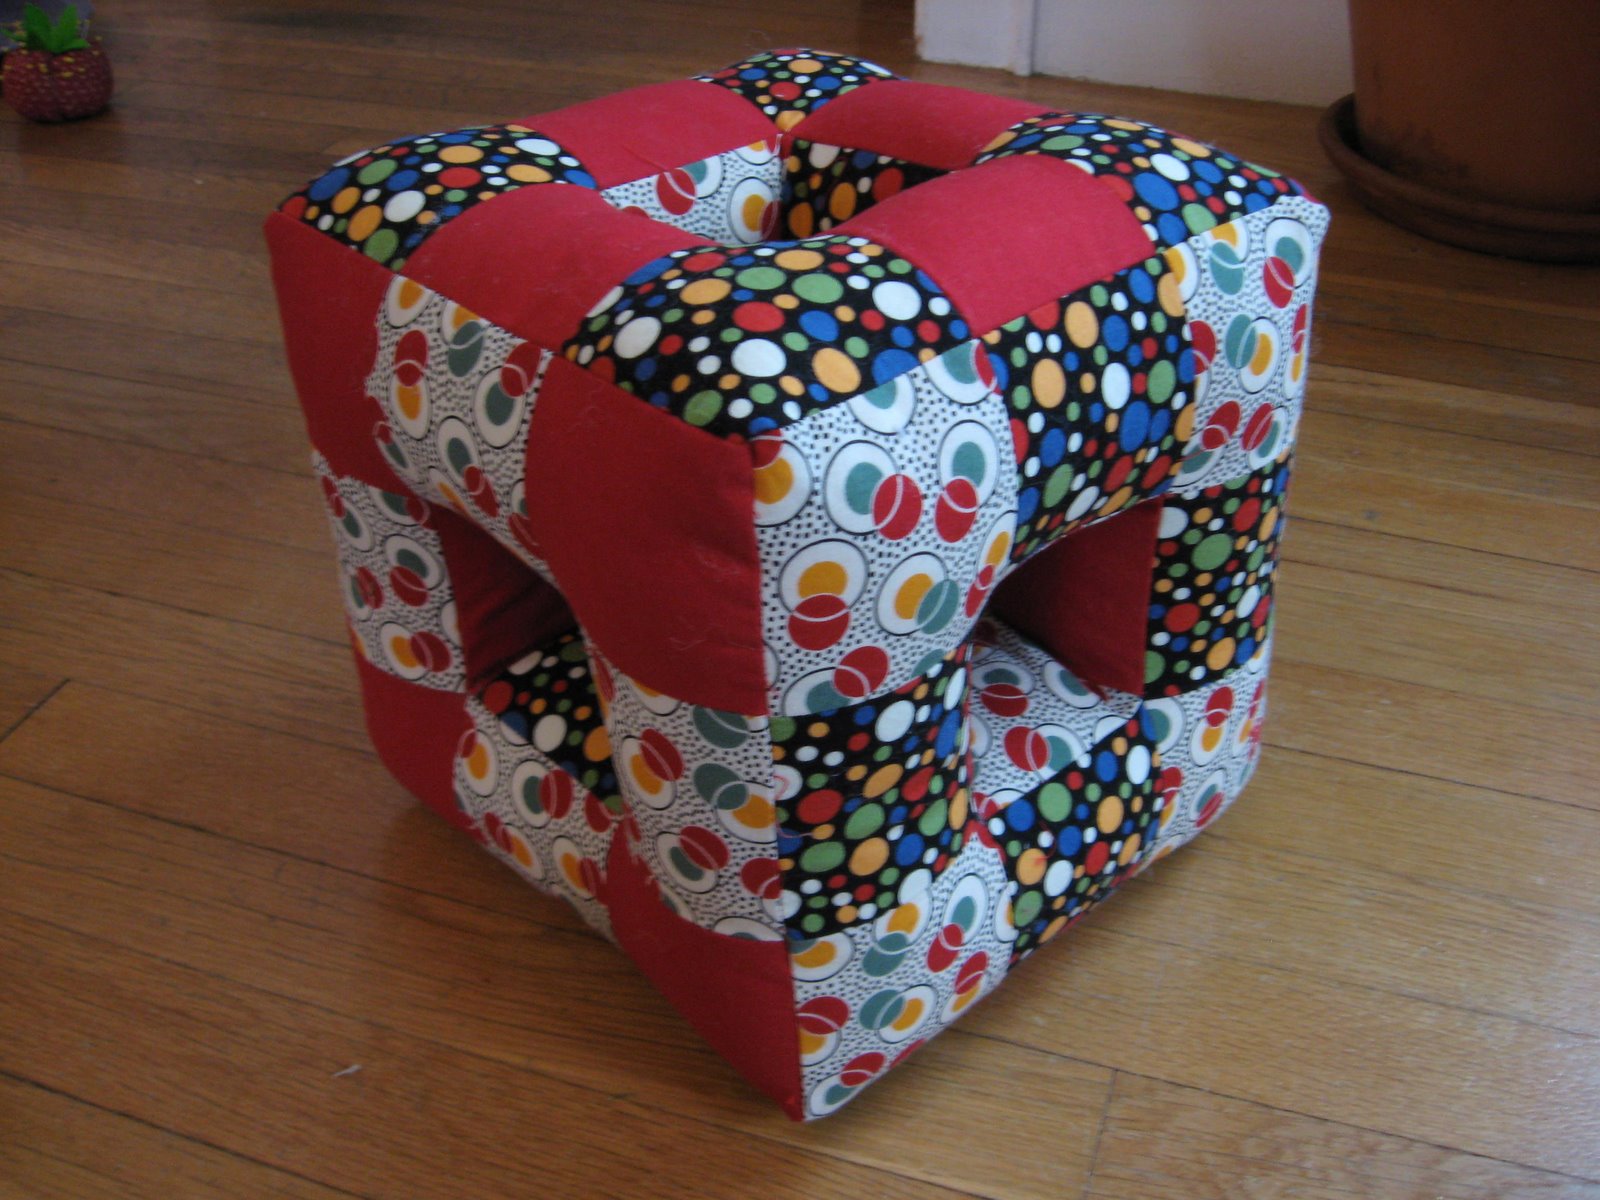
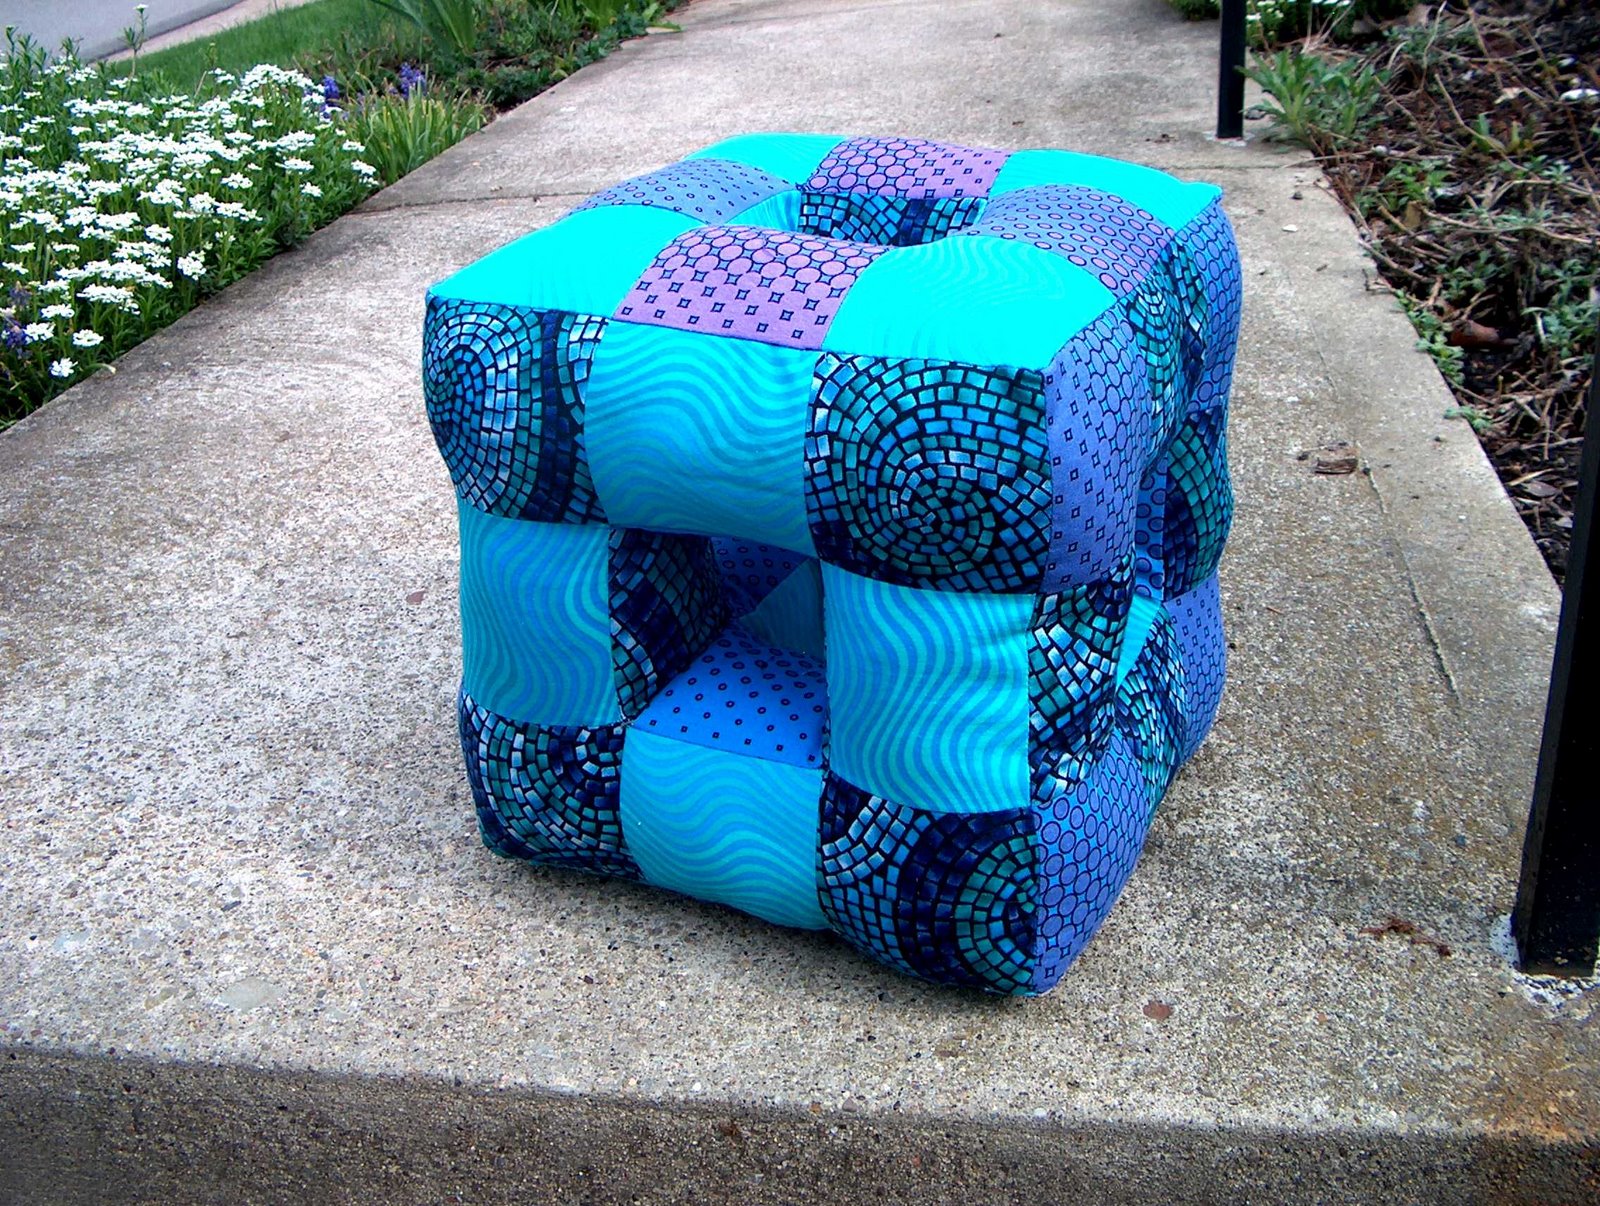
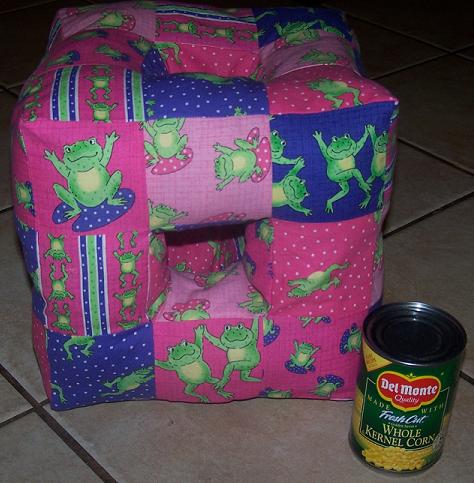
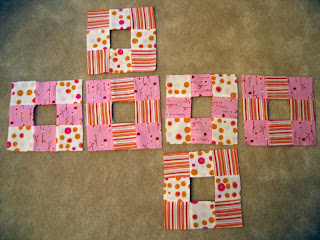
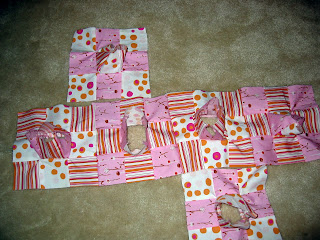
Here are all six finished blocks. In this picture, the blocks are arranged in their finished cube order.


Step 3: Inner Boxes

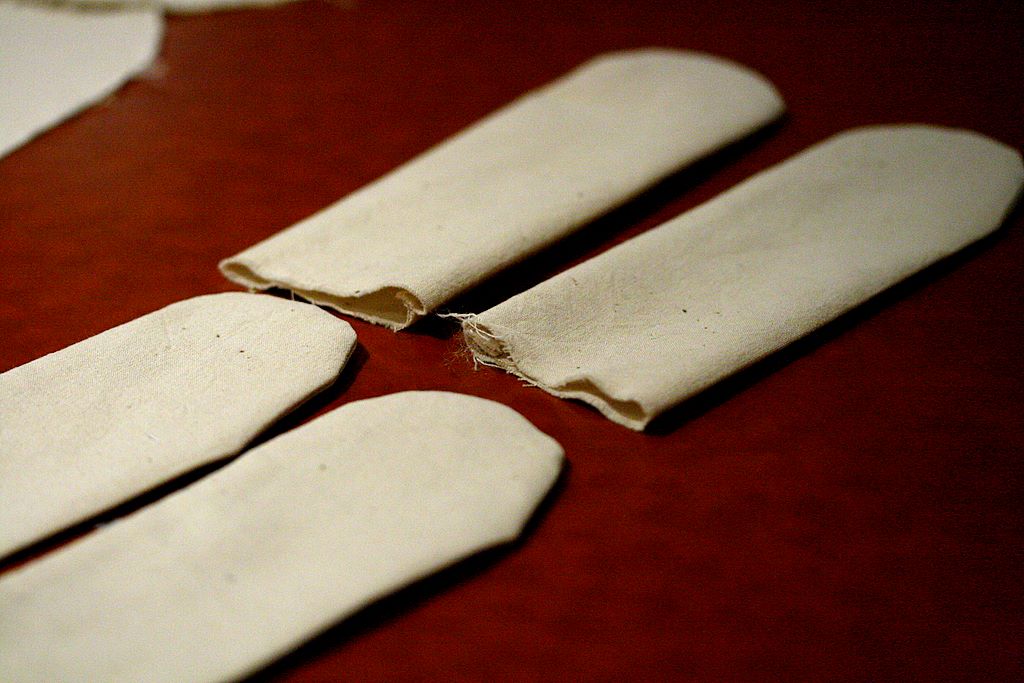
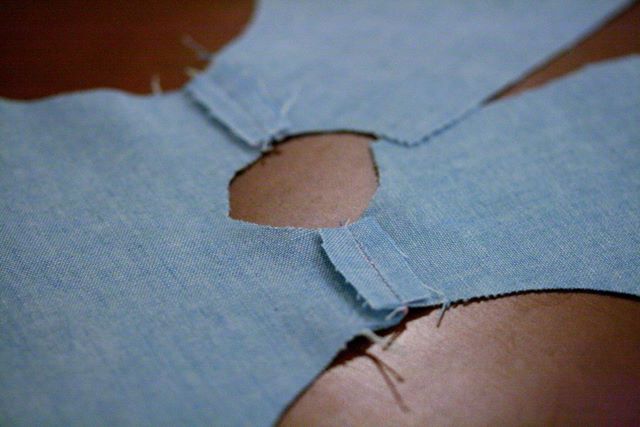
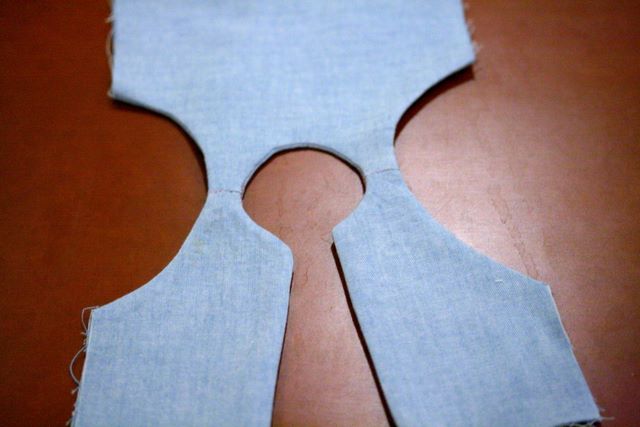
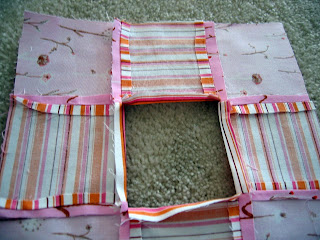
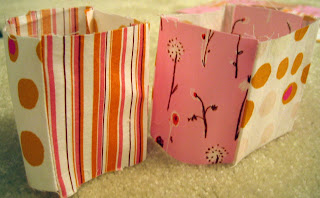
Now turn to your second group of squares, the 24 that were reserved at the end of Step 1. Further subdivide them into six sets of four, with two types of fabric in each set (e.g., two each of A,B,A,B and B,C,B,C and C,A,C,A). Sew each set of four squares into a box, open on the top and bottom, like this.


These are your inner boxes, which you will next attach one to each of the foundation blocks created in Step 2 above.
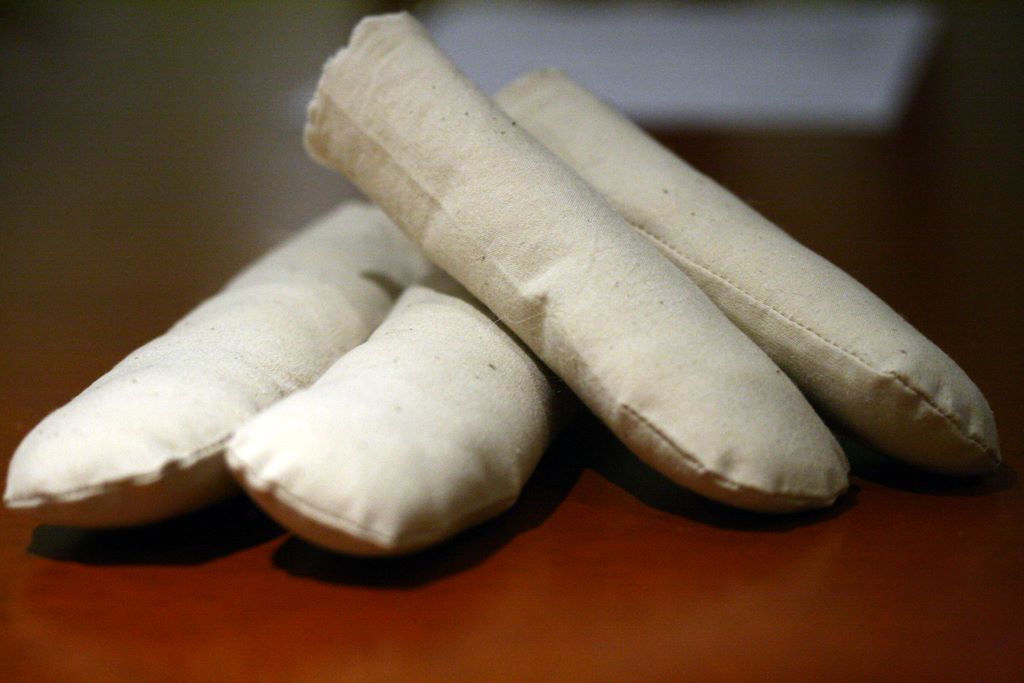
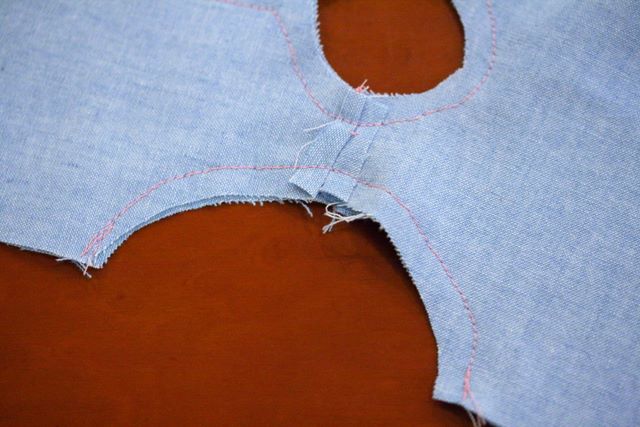
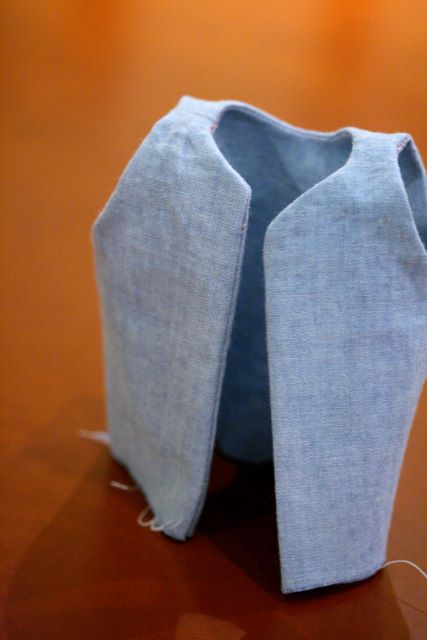
Step 4: Attaching the Inner Boxes

The goal of this step is to get all six of the inner boxes attached to the inside area of the foundation blocks. You will wind up with the inner box sticking up out of the center of the foundation block, creating a perpendicular structure.

Start by placing one right side of an inner block to the inside of one inner part of a foundation block. Sew that seam, backtacking at both ends. Turn the work and reposition the adjacent box edge to the next inner foundation block edge. At this stage it becomes important to be aware of your seam allowances as you begin and end each of the inner seams. Leave some space at the start and finish approximately equal to your seam allowance. This will become more intuitive as you start working on it, though.

Here is a shot of the underside of the finished perpendicular structure.


And here are all six blocks, ready for Step 5.


Step 5: Assembling the Sides

Now for the fun part - assembling the cube. Lay out your six blocks in the correct order. Then take the top and bottom pieces and put them aside.


Assemble the four middle pieces into a box by seaming four long lines, one on each edge, right sides facing. After this step, the box looks like this.


Now retrieve the top and bottom pieces and sew them onto the two open ends of the cube. Leave a wide opening on one side of either the top or bottom (which is which anyway?) so that you can turn the cube inside out, finish the inside seaming and then stuff.

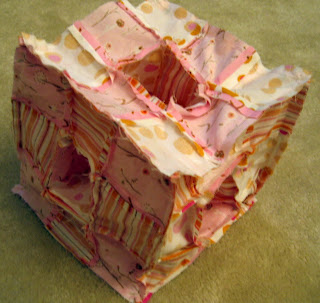
This opening should be pretty wide because you will be pulling fabric through to seam it in Step 6 below. I like to leave most of one whole side open for this purpose, sewing only around the corners and a little way in on each side for neatness. Here is what your cube looks like once the top and bottom have been added (still inside out).


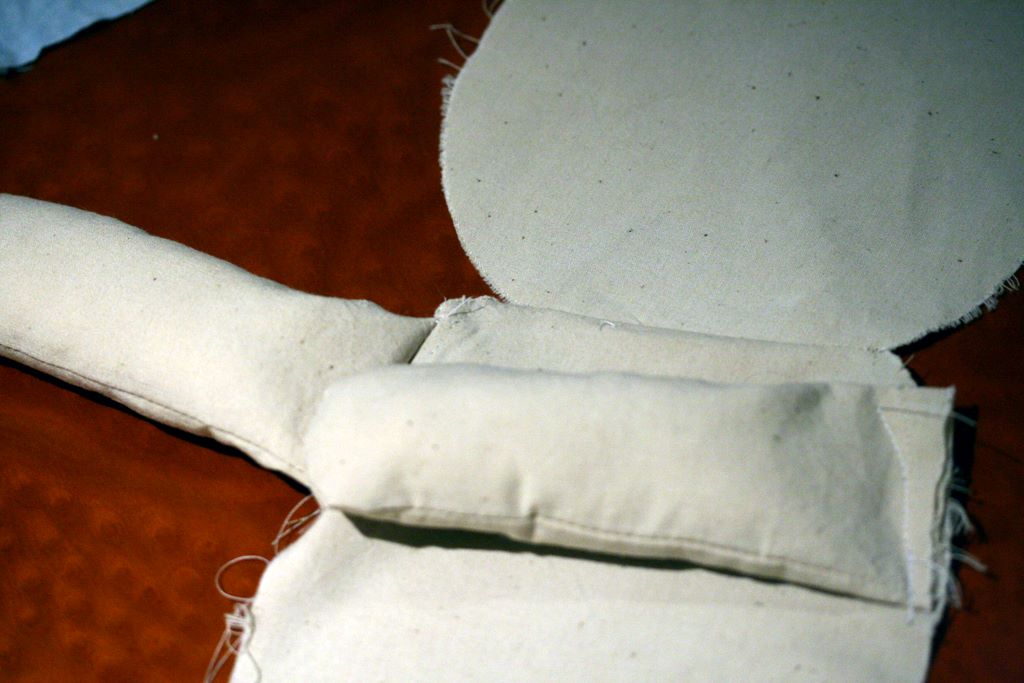
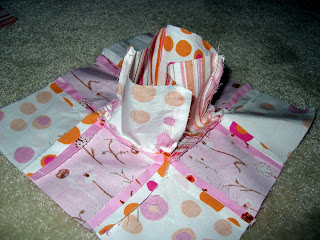
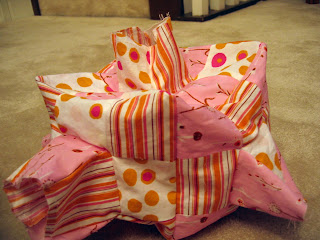
Turn your cube right side out. Each side will have the inner box sticking straight out. It looks like this.


Now push each of the six inner boxes inside the cube. Like this.


At this stage, it would be really helpful for you to pick up the structure and feel around inside to get a sense for how the remaining seams need to come together to make the cube. Got the picture in your head? Alright, now let's proceed to Step 6.

Step 6: Inside Seaming

First, put your work down and go pour yourself a glass of wine. It works for me anyway.

Relax and have faith that this step is easier than it appears at first glance. Reach inside the cube and grasp two squares that should be seamed together. How do you know if the squares should be seamed together? Well, this is where having a good visual image of the finished structure is really helpful. If you reach in from the top and from the left, for example, the top square of the inner box on the left (which faces into the cube from the left) will join with the left square of the top box (which faces down into the cube). Put your hands into the cube and you will see that these two squares line up naturally.

Take a look at the fabric patterns of the two squares in your hand to make sure you end up seaming the correct two squares. Grab onto the two squares tightly and pull them out though the turning opening. You may have to drag them through some tunnels of fabric to get them into the open for sewing. The cube will be half inside out, half right side out. Then sew the squares together, right sides facing and backtacking at both ends.

Restore the newly seamed squares back to their rightful place inside the cube and check to make sure you did it correctly. If all is well, then proceed to the next two squares. If you somehow seamed the wrong two squares together and the structure is now all wonky - no worries! Just get out your seam ripper and start again.

Seam all inner squares in this way until the cube is whole with no inside gaps. You are now ready to stuff!

Step 7: Stuffing

For most of my dolls, I prefer using wool stuffing because it adds a really nice weight and feel. However, the cube is probably going to be used most by someone who drools a lot, so it is probably better off full of machine washable polyfill.

I like to stuff my cubes firmly as it gives a nice sturdiness and definition to the structure. Once the object is stuffed, use a whipstitch or similar stitch to close the turning opening.


That's all there is to it. Please be sure to let me know if you make a cube using this tutorial. I would be tickled to see it. Also give me a shout if you run into problems, and I'll try to troubleshoot. Have fun!

Labels: ,

Sunday, March 11, 2007

Sleep Sack

The more I read about babies, the more I realize I have some pretty serious misconceptions. Take sleeping, for example. Apparently babies should be laid down with nothing in the crib - no blankets, no toys, no pillows. If the baby can turn over, then no bumper pads either. All of these things can smother a child during the night, so out of the crib they go. Consumer Reports has pretty much put the kabosh on all of my visions of cute bumpers and quilts.

Enter the sleep sack, which Europeans have been using for years. This is basically a bag that the child wears to keep warm while sleeping. This version was made from an Ottobre pattern - #7 from Issue 5/2006. I used microfleece for the body and interlock knit for the binding.


The applique was made from a scrap of flannel fabric. Funky Monkey indeed.


Now let me say that this was my first experience attaching knit binding with a twin stretch needle. This is hard, people, hard! If you look too closely, you will see that I am definitely learning. I even broke the needle at the very end, so no more twin sewing until I order a replacement from the States. Note to self - buy multiples.


I learned the following in this exercise.

1) Go slowly with the twin needle. On curves, sharp ones especially, turn the wheel by hand.
2) Set the stitch length long and keep the tension loose.
3) Stretch the binding as you sew, more than you think necessary. Else the binding will be loose and ruffly around the curves.
4) Check to see that the binding is feeding properly as you go, or some unsightly seams may peek through on the back side.
5) Go slowly. For reals.

While this particular sleep sack is certainly not gift worthy, it is not a bad first stretch binding project. One of the things I like so much about sewing, and knitting for that matter, is that I am challenged with new skills and techniques all the time. I love that I am constantly learning, constantly getting better. A nice way to contextualize mediocre work, wouldn't you say?

Labels:

Sunday, January 21, 2007

Getting My Craft On

A few weeks ago, I stumbled across a lovely blog written by a lady named Michele. She and a friend are hosting a monthly craft-a-long, and I decided to jump in. The theme this month is "bag," and I interpreted that a little loosely. My item is more of a fabric container than a true "bag." But really, I desperately needed something to organize my straight knitting needles, so a new needle roll was calling my name.


I used a pattern published by Favorite Things, and it came together easily. The fabric is from Amy Butler's collection. The orange in this makes me feel good. I used to claim that my favorite colors were shades of bl